11133 Martingale Way 💠 Rancho Cucamonga
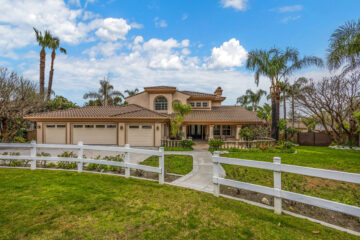
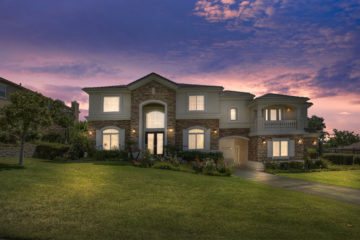
Breathtaking Mountain Views from this Estate Collection of Deer Creek home.

Breathtaking Mountain Views from this Estate Collection of Deer Creek home.
This Custom Home is favorably located on a Cul-de-Sac in the Alta Loma area of Rancho Cucamonga, north of the 210 freeway.

Prop 19 goes into effect April 1, 2021 there are several elements to this proposition that could impact your next real estate transaction. If you own property in CA you know property tax is an important consideration in your budget. If you are 55 years old, or severely disabled, or victim of a wildfire or natural disaster and thinking about selling your home it is imperative that you understand Prop 19 and seek professional counsel.
Each office is independently owned and operated. Information deemed reliable, but not guaranteed.
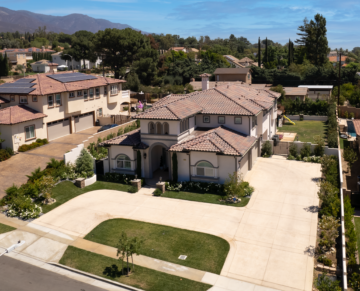
Grand Estate Home! Considerable Yard! Gated and Guarded Community! These three in one property do not come available very often, this is a must-see home. Just shy of one acre, 8116 square foot custom home in Haven View Estate, Rancho Cucamonga awaits you.
~ SOLD ~
Fabulous estate within the Guarded-Gated Community of Haven View; combines both function and an elegant lifestyle in every manner. Your new residence gives a true-life ambiance of grandeur punctuated with mountain and city-lights views. Iconic curved double-stair entry surrounds the receiving marble floored rotunda; proudly announcing to your guests the grandeur of your home. Communal areas are large and inviting; including living, dining, kitchen and family rooms. The large Two-Story Windows invite the outdoor brightness and views inside, aiding to the character and atmosphere of your abode. The Master’s bedroom suite incorporates a fireplace and large balcony overlooking the entertainer’s backyard and heartwarming city-lights views. Cool off in your pool with the tranquil sound of two water cascades or quench your thirst at the bar of the fully appointed outdoor kitchen. 180 degrees views are also enjoyed from the balcony adjoining the large western facing bedroom. All secondary bedrooms have their own private bath. One bedroom and office on the first floor. Please, invest in the 45 min tour of the property and appreciate the worth of your new address.
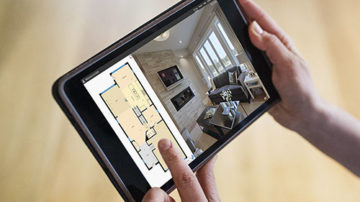
What is the most efficient way to share the most information about a home? 3D Virtual Tours provide multiple layers of accurate information that allow a buyer to experience the home from the comfort of their present location.
The goal of this eGuide is to provide you with the information you will need to make the best decision for you and your family in regards to homeownership. We will break down the myths and stereotypes that have long been believed to be true, as well as shed light on the opportunity you have to build wealth using your monthly housing cost.
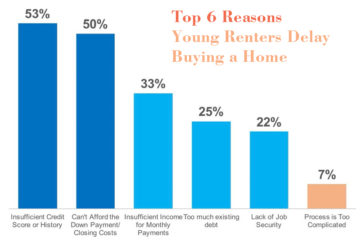
The challenge is that many of those who delay their purchases are not aware of the opportunities available, and are not aware that they would qualify now. Instead of wasting time paying rent, they could be building their own wealth by putting their housing costs to work for them through the equity in their home.
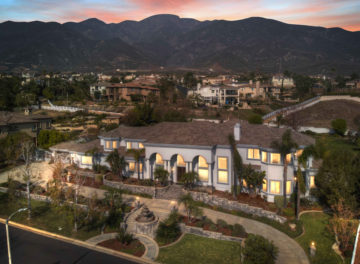
SOLD – Private Haven View Estates home nestled at the base of the mountains of Rancho Cucamonga in this gated and guarded neighborhood. This home is comfortably infused with natural light and abounds with both Mountain and City Lights Views. Entertaining delight with the additional 450 sq. ft. Casita/Patio Room. Many beautiful features to this home, you must schedule your visit today to fully understand the value.

~ SOLD ~
“We had Brett and his DayBreak Group represent us on our last sale transaction. Brett and his team are very professional. We were very happy with everything from start to finish. The photographer they use is top-notch. The staging advice was perfect. The showings were always very professional. We ended up with several offers and Brett helped us choose the best one. Once we were in escrow, the team made sure we had everything done on time. We will continue to use Brett and his team for our future real estate transactions.”
~Brad K.
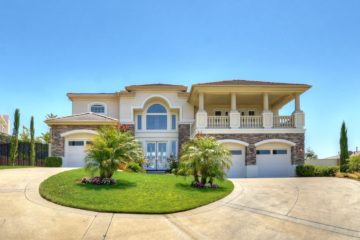
– Luxury Home like living in your own private resort! Nestled up against the mountains in the gated and guarded Haven View Estates. Your family room flows seamlessly into the relaxing outdoor living area. Unmatched attention to detail!